Thursday, 5. June 2025 Week 23
benjojo does some clever data analysis for Picking uncontested private IP subnets with usage data.
He not only gathers the usage data of the various subnets, but also provides a nice tool to get a /24 subnet from the list that has no known users.
And to top it off the article also provides the underlying data.
A Zip file with the /24 subnets with number of known users (local copy).
And the distilled list of subnets that have no known users (local copy).
Wednesday, 25. December 2024 Week 52
ComCom orders: Swisscom must operate zero-settlement peering with Init7
This will cause implications in the industry at home and abroad.
The proceedings revealed that Swisscom together with Deutsche Telekom had formed a cartel in order to force payments from content providers.
Internet providers have a technical monopoly on access to their end customers and Swisscom acted as a kind of gatekeeper;
only those who paid “enough” could send traffic (e.g. video streaming) to their end customers [...].
Saturday, 12. October 2024 Week 41
sshidentifierlogger is a small tool that I started writing about 5 years ago and have been using on some of my hosts.
Its purpose is to listen to network traffic and passively collect identification strings during SSH handshakes.
Initially I had a lot of fail2ban activity on my jumphost, blocking many SSH scanning/enumeration/bruteforcing attempts and wanted to know what software the attackers use.
A bit particular is that sshidentifierlogger does not depend on the classic C library libpcap, but rather uses the go-native pcapgo implementation by gopacket.
Thus it can be cross-compiled on any platform, which comes in handy when you do not want to install the full go buildchain on your jumphost.
The collected data is quite interesting (most of the scanning used to be done with libssh2).
Which I did leverage to write iptables rules blocking packets with undesired SSH identification strings.
This has been quite successfull in reducing the amount of fail2ban activity :-)
Saturday, 22. June 2024 Week 25
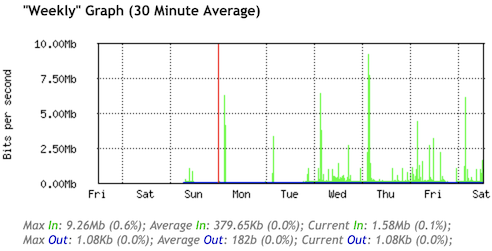
Out of curiosity I wanted to know how much of my Internet traffic uses IPv6 vs the legacy IPv4.
There is no out-of-the-box graph for this in MikroTik.
Several forum and Stack Overflow posts suggest using ratelimiting queues with their graphing feature to collect this data.
After experimenting a bit, I ended up with the following configuration which creates two queues to collect the traffic data.
Important to know, traffic flows on a first-match basis through the queues. Thus the trick of having first the queue matching IPv6 traffic and then the queue matching all the remaining traffic.
Also, I use 10G as 'unreachable' traffic limit to avoid any traffic being ratelimited. This works well for my 1Gbit/s setup, but will need to be adjusted if you have a higher bandwidth.
/queue simple add limit-at=10G/10G max-limit=10G/10G name=v6-traffic queue=ethernet-default/ethernet-default target=2000::/3 total-queue=ethernet-default
/queue simple add limit-at=10G/10G max-limit=10G/10G name=v4-traffic queue=ethernet-default/ethernet-default target="" total-queue=ethernet-default
Having the queues in place for a couple days results in the following graphs:
IPv6 Traffic
IPv4 Traffic
Happy to see that a large majority of my traffic uses IPv6 :-)
Thursday, 11. April 2024 Week 15
This post from Rachel, reminded me of my own struggle with a Raspberry Pi and time (and yes, I did run into the same DNSSEC problem).
I first tried a RTC shield, but this didn't fully solve all problems.
My workaround in the end is to use two fixed IP addresses in ntp.conf in additon to the usual pool servers.
Thanks ${previous employer} for not changing the IPs of your public NTP servers so far :-)
Wednesday, 10. April 2024 Week 15
As hinted at in my previous post, Solnet is delivering native IPv6 Internet again.
Shortly after 23h on March 26th there was a brief interruption of the Internet uplink and afterwards my router started receiving an IPv6 address again.
My support ticket with Solnet is still unanswered, but at least IPv6 is back :-)
While browsing through the archives I stumbled upon the SixSpotting post from 2014.
Turns out the game is still working and after some failed attempts I managed to remember my account name and log in.
I guess it must look quite strange to see a burst of new checkins after almost 10 years 😄
Sunday, 25. February 2024 Week 8
After nicely delivering native IPv6 connectivity for 3 years, my Internet provider Solnet made some changes in their backbone config on January 31st which broke their IPv6 setup.
Unfortunately escalating with their support did not bear any fruits so far (current state: they no longer respond on the support ticket…).
Thus change of plans, tunnelbroker.net (Hurricane Electric) to the rescue.
Took about 10 minutes to set everything up and now I'm enjoying IPv6 connectivity again (although with a reduced end-to-end MTU due to the 6in4 encapsulation).
Guess I'll have to look for a different Internet provider again.
Especially annoying is that I renewed the yearly plan with Solnet only a couple weeks ago, so will be stuck without native IPv6 connectivity for the next 11 months :-(
Saturday, 30. December 2023 Week 52
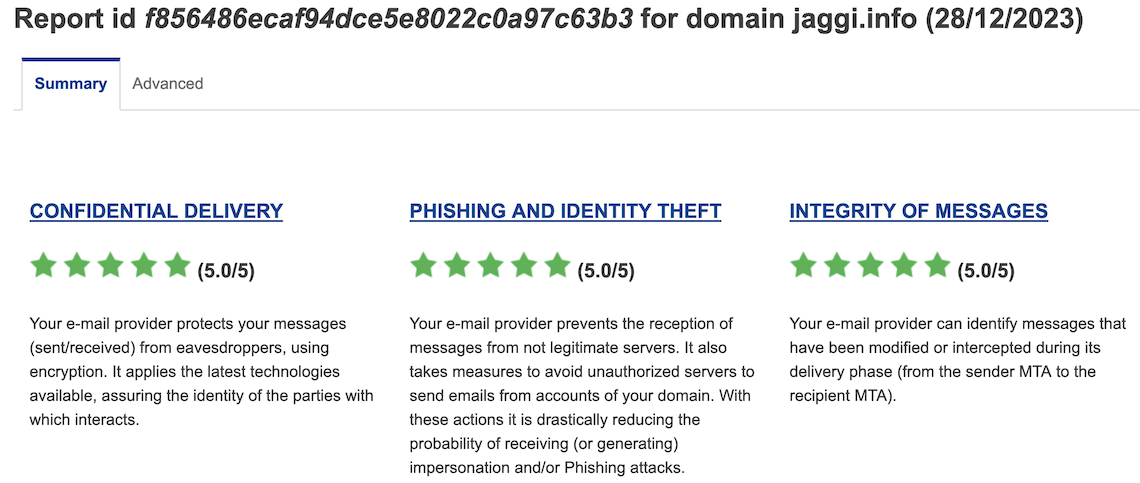
A comment on Hacker News pointed me to the MECSA tool provided by the European Union.
MECSA stands for My Email Communications Security Assessment, and is a tool to assess the security of email communication between providers.
As I run my own email server, I was curious to find out how my setup is scoring. Here are the results, seems like I'm doing a good job :-)


Link to the full report for jaggi.info: https://mecsa.jrc.ec.europa.eu/en/finderRequest/f856486ecaf94dce5e8022c0a97c63b3
Wednesday, 18. January 2023 Week 3
Let's Encrypt recently introduced support for ACME-CAA.
I've now extended my existing CAA DNS entries with the ACME-CAA properties:
% dig +short -t CAA x-way.org
0 issue "letsencrypt.org; accounturi=https://acme-v02.api.letsencrypt.org/acme/acct/68891730; validationmethods=http-01"
0 issue "letsencrypt.org; accounturi=https://acme-v02.api.letsencrypt.org/acme/acct/605777876; validationmethods=http-01"
The effect of this is that Let's Encrypt will only grant a signed TLS certificate if the request comes from one of my two accounts (authenticated with the corresponding private key).
If the certificate request comes from a different account, no TLS certificate will be granted.
This protects against man-in-the-middle attacks, specifically against attacks where someone between Let's Encrypt and my server would be trying to impersonate my server to obtain a signed TLS certificate.
Addendum:
In case you're wondering where to get the accounturi value from, it can be found in your account file:
% cat /etc/letsencrypt/accounts/acme-v02.api.letsencrypt.org/directory/*/regr.json
{"body": {}, "uri": "https://acme-v02.api.letsencrypt.org/acme/acct/605777876"}
Saturday, 26. March 2022 Week 12
A while ago I wrote a little tool to set the time on MikroTik devices.
It takes the current time from the local machine and does set it on the device through the API (while respecting the timezone configured on it).
I mostly use it to set the proper time when the device time was completely off (when setting up a new device or when it has been powered off for a long time).
Afterwards NTP should take care of keeping the time in sync.
The tool is now available on GitHub together with installation and usage instructions: mt-set-time
Saturday, 29. January 2022 Week 4
After switching my Debian hosts from Quagga to FRRouting, I noticed that running vtysh has become quite a bit slower especially when making multiple calls to it from my status/monitoring scripts.
This has also been observed by other users of FRRouting (there's an open issue in their bugtracker: #7799).
The Prometheus frr_exporter works around this by directly sending commands to the UNIX sockets of the FRR daemons (PR).
To use the same approach in my monitoring scripts, I wrote a small utility which acts as a drop-in replacement for vtysh and sends the commands directly to the UNIX sockets of the FRR daemons: vtysock
By skipping the parsing and validation checks done in vtysh, vtysock can achieve a significant speed improvement when executing commands.
Sunday, 23. January 2022 Week 3
In situations where IPv6 connectivity performs better than IPv4, you might want to force SSH to use IPv6. In interactive mode this can be achieved with the -6 commandline parameter.
But in situations where you can't modify the commandline parameters a different approach is needed (for example in rsync backup scripts which use SSH as underlying transport layer).
We can use the ssh_config file to encforce that IPv6 is used for a specific host:
Host myipv6host
	AddressFamily inet6
This instructs all SSH commands to use IPv6 when connecting to myipv6host.
The same approach also works to force usage of Legacy IP by specyfing inet as address family.
Saturday, 17. April 2021 Week 15
From the article on Security Boulevard.
- Rafay Baloch
- Troy Hunt
- Kevin Mitnick
- Rachel Tobac
- Mikko Hyppönen
- Katie Moussouris
- Bruce Schneier
- Brian Krebs
- Jeremiah Grossman
- Eugene Kaspersky
- Dan Lohemann
- Steve Morgan
- Tyler Cohen Wood
- Graham Cluley
- Theresa Payton
- Shira Rubinoff
- Eva Galperin
- Marcus J. Carey
- Jayson E Street
- Paul Asadoorian
- Adam K. Levin
Thursday, 4. February 2021 Week 5
This was the initial state of my new SolNet fibre connection:

As I am a proponent of IPv6 this made me very happy, but unfortunately about 20% of my daily websites only offer legacy Internet (which later on I got working as well).
Saturday, 5. December 2020 Week 49
Sunrise does not like when people run their own router on a fiber line. While they do not directly forbid it, they don't provide any of the required configuration parameters which makes it quite hard to use your own router.
Below you'll find the required configuration parameters to make your own router connect with IPv4 and IPv6 on a Sunrise fiber line.
Beware though that especially the VLAN configuration might be different depending on your city, the following worked for me in Zürich.
Also, please note that I do not recommend Sunrise as Internet provider (as a matter of fact I'm on the way out of their contract and switching to SolNet).
Besides not supporting to bring your own router, they also like to make up additional early-termination fees (the contract states 100CHF early termination fees, but once you call them to initiate the process they tell you that it's gonna cost 300CHF as they decided to change their pricing structure unilaterally).
Enough of the ranting, now to the interesting part :-)
The Sunrise line has multiple VLANs to differentiate between Internet, Phone and TV services.
To receive an IPv4 address it requires a special value for the Client Identifier DHCP option.
For IPv6 6rd is employed, for which we need to know the prefix and gateway address.
The following configuration was tested with a MikroTik CRS125 router starting from the default settings.
For simplicity I've named the network interfaces according to their intended usage (eg. LAN, sunrise and 6rd).
The first step is to configure the VLAN on top of your fiber interface. In my case it was VLAN ID 131, others were also successful with VLAN ID 10.
/interface vlan add interface=sfp1-gateway name=sunrise vlan-id=131
Next let's put in place some basic firewall rules to make sure we're not exposing our LAN to the Internet once the connection comes up.
/ip firewall filter
add action=accept chain=forward connection-state=established,related
add action=accept chain=forward in-interface=LAN out-interface=sunrise
add action=drop chain=forward
add action=accept chain=input connection-state=established,related
add action=accept chain=input protocol=icmp
add action=drop chain=input in-interface=!LAN
/ip firewall nat
add action=masquerade chain=srcnat out-interface=sunrise
Now we can configure the special value for the Client Identifier DHCP option and configure the DHCP client on the VLAN interface.
/ip dhcp-client option add code=61 name=clientid-sunrise value="'dslforum.org,Fast5360-sunrise'"
/ip dhcp-client add dhcp-options=clientid-sunrise disabled=no interface=sunrise
This should now give us IPv4 Internet connectivity. We can test this by checking that we received an IPv4 address, have an IPv4 default route and that we can ping a host in the Internet.
/ip dhcp-client print
Flags: X - disabled, I - invalid, D - dynamic
 #   INTERFACE       USE-PEER-DNS ADD-DEFAULT-ROUTE STATUS        ADDRESS
 0   sunrise         yes          yes               bound         198.51.100.123/25
/ip route check 1.1
     status: ok
  interface: sunrise
    nexthop: 198.51.100.1
/ping count=1 1.1
  SEQ HOST                                     SIZE TTL TIME  STATUS
    0 1.0.0.1                                    56  59 1ms
    sent=1 received=1 packet-loss=0% min-rtt=1ms avg-rtt=1ms max-rtt=1ms
Sunrise doesn't offer native IPv6 connectivity but employs 6rd (which defines how to create a 6to4 tunnel based on the public IPv4 address, an IPv6 prefix and the tunnel gateway).
Before we setup the 6rd tunnel, it's important to put in place firewall rules for IPv6 as afterwards all devices on the local network will receive a public IPv6 address.
/ipv6 firewall filter
add action=accept chain=forward connection-state=established,related
add action=accept chain=forward in-interface=LAN
add action=drop chain=forward
add action=accept chain=input connection-state=established,related
add action=accept chain=input protocol=icmpv6
add action=drop chain=input
To setup the 6rd tunnel, I've modified an existing script with the specific parameters for Sunrise (namely the 2001:1710::/28 prefix and the 212.161.209.1 tunnel gateway address).
The script creates the tunnel interface, configures an IPv6 address on the external interface, configures an IPv6 address on the internal interface (which also enables SLAAC to provide IPv6 addresses to the clients on the local network) and configures an IPv6 default route over the 6rd tunnel.
The script itself will be run via the scheduler, thus let's save it under the name 6rd-script.
:global ipv6localinterface "LAN"
:global uplinkinterface "sunrise"

:global IPv4addr [/ip address get [find interface=$uplinkinterface] address];
:global IPv4addr [:pick $IPv4addr 0 [:find $IPv4addr "/"]]
:global IPv4addr2 [:pick $IPv4addr 0 30]
:global IPv6temp [:toip6 ("1::" . $IPv4addr2)]

:global IPv4hex1 [:pick $IPv6temp 3 4]
:global IPv4hex2 [:pick $IPv6temp 4 7]
:global IPv4hex3 [:pick $IPv6temp 8 9]
:global IPv4hex4 [:pick $IPv6temp 9 12]
:global IPv6addr [("2001:171" . $IPv4hex1 . ":". $IPv4hex2 .$IPv4hex3 . ":" . $IPv4hex4 . "0::1/64")]
:global IPv6addrLoc [("2001:171" . $IPv4hex1 . ":". $IPv4hex2 . $IPv4hex3 . ":" . $IPv4hex4 . "1::1/64")]

#6to4 interface
:global 6to4id [/interface 6to4 find where name="6rd"]
:if ($6to4id!="") do={
:global 6to4addr [/interface 6to4 get $6to4id local-address]
if ($6to4addr != $IPv4addr) do={ :log warning "Updating local-address for 6to4 tunnel '6rd' from '$6to4addr' to '$IPv4addr'."; /interface 6to4 set [find name="6rd"] local-address=$IPv4addr }
} else { :log warning "Creating 6to4 interface '6rd'. "; /interface 6to4 add !keepalive local-address=$IPv4addr mtu=1480 name="6rd" remote-address=212.161.209.1 }

#ipv6 for uplink
:global IPv6addrnumber [/ipv6 address find where comment="6rd" and interface="6rd"]
:if ($IPv6addrnumber!="") do={
:global oldip ([/ipv6 address get $IPv6addrnumber address])
if ($oldip != $IPv6addr) do={ :log warning "Updating 6rd IPv6 from '$oldip' to '$IPv6addr'."; /ipv6 address set number=$IPv6addrnumber address=$IPv6addr disabled=no }
} else {:log warning "Setting up 6rd IPv6 '$IPv6addr' to '6rd'. "; /ipv6 address add address=$IPv6addr interface="6rd" comment="6rd" advertise=no }

#ipv6 for local
:global IPv6addrnumberLocal [/ipv6 address find where comment=("6rd_local") and interface=$ipv6localinterface]
:if ($IPv6addrnumberLocal!="") do={
:global oldip ([/ipv6 address get $IPv6addrnumberLocal address])
if ($oldip != $IPv6addrLoc) do={ :log warning "Updating 6rd LOCAL IPv6 from '$oldip' to '$IPv6addrLoc'."; /ipv6 address set number=$IPv6addrnumberLocal address=$IPv6addrLoc disabled=no }
} else {:log warning "Setting up 6rd LOCAL IPv6 '$IPv6addrLoc' na '$ipv6localinterface'. "; /ipv6 address add address=$IPv6addrLoc interface=$ipv6localinterface comment="6rd_local" advertise=yes }

#ipv6 route
:global routa [/ipv6 route find where dst-address="2000::/3" and gateway="6rd"]
if ($routa="") do={ :log warning "Setting IPv6 route '2000::/3' pres '6rd'. "; /ipv6 route add distance=1 dst-address="2000::/3" gateway="6rd" }
Once we've added the script we also need to create the scheduler entry to run it periodically (as it needs to re-configure the tunnel and addresses whenever the public IPv4 address changes).
/system scheduler add interval=1m name=schedule1 on-event=6rd-script
After the first run of the script we should now have IPv6 connectivity. Let's test this again by checking that we have a public IPv6 address, an IPv6 default route and can ping an IPv6 host in the Internet.
/ipv6 address print where interface=6rd and global
Flags: X - disabled, I - invalid, D - dynamic, G - global, L - link-local
 #    ADDRESS                                     FROM-POOL INTERFACE        ADVERTISE
 0  G ;;; 6rd
      2001:171c:6336:47b0::1/64                             6rd              no
/ipv6 route check 2600::
     status: ok
  interface: 6rd
    nexthop: 2600::
/ping count=1 2600::
  SEQ HOST                                     SIZE TTL TIME  STATUS
    0 2600::                                     56  50 118ms echo reply
    sent=1 received=1 packet-loss=0% min-rtt=118ms avg-rtt=118ms max-rtt=118ms
And that's how you can configure and validate IPv4 and IPv6 connectivity with your own router on a Sunrise fiber line despite them not liking it very much ;-)
Saturday, 21. November 2020 Week 47
Recently I added MTA-STS support to one of my domains, and it turns out that this was easier than expected.
MTA-STS is used to tell mail senders that your server supports TLS. And then you can define the policy for your server and tell them that they should only use TLS (resp. STARTTLS) when connecting to you and not fall back to unencrypted SMTP.
The way this works is with two components:
- a special
_mta-sts.<your-site.com> TXT DNS entry indicating that your domain supports MTA-STS and the version number of your MTA-STS policy
- a mta-sts.txt file served under a specific well-known URL
https://mta-sts.<your-site.com>/.well-known/mta-sts.txt containing your MTA-STS policy (which mx hosts it is valid for, should it be run in enforcing or testing mode, max-age etc.)
The idea is that a mail sender checks your MTA-STS policy through protected channels (DNSSEC, HTTPS) and then never sends mails to you in plaintext (similar approach as HSTS for HTTP but this time between mail servers).
To setup the MTA-STS configuration, I followed this Enable MTA-STS in 5 Minutes with NGINX guide from Yoonsik Park.
Then to check my configuration I used this MTA-STS validator (which is an opensource project available on GitHub), the classic checktls.com //email/testTo: tool (MTA-STS checking needs to be explicitly enabled under 'More Options') and the free testing service provided by Hardenize.
Saturday, 31. October 2020 Week 44
Compared to the previous post where intentional NAT traversal was discussed, here now comes an article about 'unintentional' (malicious) NAT traversal.
Samy Kamar describes in his NAT Slipstreaming article how a combination of TCP packet segmentation and smuggling SIP requests in HTTP, can be used to trick the NAT ALG of your router into opening arbitrary ports for inbound connections from the Internet to your computer.
The article analyses in detail the SIP ALG of the Linux netfilter stack in it's default configuration, but likely similar attacks could also be possible with ALGs of other protocols and vendors.
Important to note: the Linux SIP ALG module has two parameters (sip_direct_media and sip_direct_signalling), which restrict the IP address for which additional ports are opened to the one sending the original SIP packet. By default they are set to 1, but if any of these is set to 0 in a router's configuration, the described NAT Slipstreaming attack will not only allow to make inbound connections to your computer, but also to any other device in the local network!
Sunday, 23. August 2020 Week 34
How NAT traversal works – is a very well written and detailed article from Dave Anderson explaining the different NAT scenarios and the tricks that can be used to establish a peer-to-peer UDP connection between machines sitting behind them.
Thursday, 21. May 2020 Week 21
While doing some maintenance on my server, I got tired of searching through the output of ip addr show to find the IP addresses configured on the interfaces.
Thus I wrote a simple CLI tool to display the information I needed in a concise and human friendly form: ipaddr
$ ipaddr
lo          127.0.0.1/8
ens5        198.51.100.160/24
tun24008    10.123.199.78/32
tun71991639 10.200.123.5/32
tun26724    10.100.100.235/32
tun3883710  10.123.111.7/32
A nice side-effect of writing this in Go is that it works out-of-the-box also on non-Linux systems :-)
Saturday, 21. March 2020 Week 12
Somehow I always end up working with lists of IP networks and needing to minimize and compare them.
Some of my Perl scripts for this might still be hidden in a corporate source repository, and somewhere in the backups of my old Linux laptop should be even earlier attempts in Bash.
Both of them are not very useful to me where they are, thus I've written yet another version.
This time in Go using the ipaddr package.
Say hello to ip_compact and ip_diff :-)
Sunday, 5. August 2018 Week 31
The Vagrant file provided by IBM for running QRadar Community Edition on Mac OS X currently does not work properly. It fails with the following error:
Failure: repodata/repomd.xml from centos-gluster38: [Errno 256] No more mirrors to try.
http://mirror.centos.org/centos/7/storage/x86_64/gluster-3.8/repodata/repomd.xml: [Errno 14] HTTP Error 404
The problem is that gluster3.8 was moved out of this CentOS repository and now the download fails.
But the gluster3.8 RPMs are also provided with the QRadar CE installation ISO file.
Based on the workaround described here, I've extended the IBM provided Vagrantfile so that the RPMs are taken from the ISO file instead of the CentOS repository.
With the modified Vagrantfile the automatic provisioning script no longer fails.
The instructions for running QRadar CE with Vagrant now look like this:
- Download the zipfile with the original Vagrantfile and the accompanying helper files from the IBM website: https://developer.ibm.com/qradar/ce/
- Create a folder and extract the zipfile:
mkdir community_edition
unzip QRadarCE_Vagrantfile.20171003084145.zip -d community_edition/
- Download the modified Vagrantfile and overwrite the original one:
curl -o community_edition/Vagrantfile https://blog.x-way.org/stuff/Vagrantfile
- Make sure you have the requried Vagrant plugins installed:
vagrant plugin install vagrant-disksize
vagrant plugin install vagrant-reload
- Make sure you have the QRadar CE ISO file (downloaded from the IBM website) in the same folder as the Vagrantfile:
cp QRadarCE.iso community_edition/
- Create the auto_install file to automatically install QRadar:
touch community_edition/auto_install
- Accept the EULA by adding the corresponding setup parameter in the Vagrantfile:
Edit the Vagrantfile and add the --accept-eula argument to /media/cdrom/setup --no-screen to automatically accept the EULA
- Change into the folder and start the QRadar installation (takes about 1 hour):
cd community_edition
vagrant up
Saturday, 5. December 2015 Week 49
With nflog_sniffer.cpp I've just added a C++ implementation to the nflog_sniff repository.
It uses the lean (and apparently also very fast) libtins library.
Friday, 4. December 2015 Week 49
The nflog-bindings from Pierre Chifflier make it trivially easy to write a passive packet sniffer which can be controlled via iptables and listens to traffic on multiple interfaces at the same time.
As a little exercise I have written a simple DNS packet sniffer, once in Perl and once in Python:
To use the sniffer, first create an iptables rule like this: iptables -I INPUT -p udp --sport 53 -j NFLOG --nflog-group 123
Then start one of the sniffer scripts and observe the extracted DNS queries :-)
For a more convenient download I've also put the scripts in a proper Github repository: nflog_sniff
Sunday, 12. July 2015 Week 28
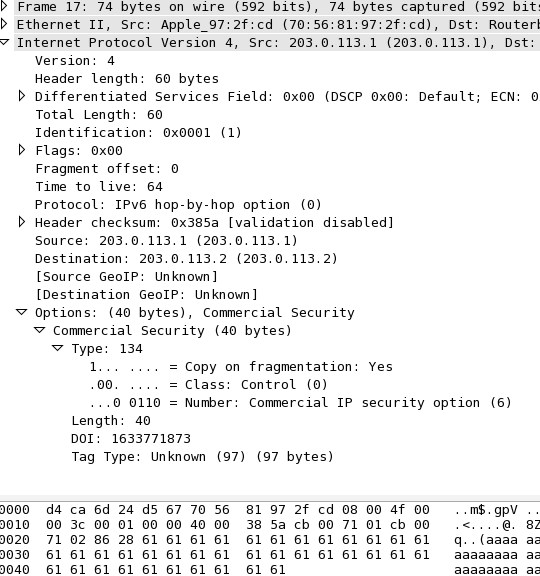
Create packets with custom IPv4 IP Option fields using Scapy:
>>> packet=IP(src="203.0.113.1",dst="203.0.113.2",options=[IPOption('%s%s'%('\x86\x28','a'*38))])
>>> ls(packet)
version    : BitField             = 4               (4)
ihl        : BitField             = None            (None)
tos        : XByteField           = 0               (0)
len        : ShortField           = None            (None)
id         : ShortField           = 1               (1)
flags      : FlagsField           = 0               (0)
frag       : BitField             = 0               (0)
ttl        : ByteField            = 64              (64)
proto      : ByteEnumField        = 0               (0)
chksum     : XShortField          = None            (None)
src        : Emph                 = '203.0.113.1'   (None)
dst        : Emph                 = '203.0.113.2'   ('127.0.0.1')
options    : PacketListField      = [<IPOption  copy_flag=1L optclass=control option=commercial_security length=40 value='aaaaaaaaaaaaaaaaaaaaaaaaaaaaaaaaaaaaaa' |>] ([])
>>> sr1(packet)
The above code results in the following packet (as seen by Wireshark):
Sunday, 11. January 2015 Week 2
(via)
Sunday, 2. November 2014 Week 44

SixSpotting, a funny little game where you collect points by logging in from as many IPv6 enabled providers as possible.
Saturday, 18. October 2014 Week 42
Lately the requests trying to exploit the Shellshock vulnerability are getting annoying.
Of course my hosts are patched — even before the first such request arrived — and they are using Dash as /bin/sh anyway.
But this does not stop attackers from sending those requests.
Some even seem to have programmed a loop which sends request after request even though their exploit is not working.
Since most of the requests are for valid URLs, the webserver just replies with a 200 status code and serves the content.
As this gives no indication to the attacker whether his exploit worked or not, he has no reason to remove the host from his target-list and thus continues to send requests.
To break this pattern and signal that the host is not vulnerable to Shellshock, I came up with the nginx config snippet below.
It recognizes Shellshock patterns in a request and replies with a '403 Forbidden' status code, thus indicating to an attacker that his request was blocked.
if ( $http_referer ~ ^\s*\(\s*\)\s*\{ ) {
        return 403 "Blocked by Shellshock protection (https://blog.x-way.org/Show-Shellshock-the-door).";
}
if ( $http_user_agent ~ ^\s*\(\s*\)\s*\{ ) {
        return 403 "Blocked by Shellshock protection (https://blog.x-way.org/Show-Shellshock-the-door).";
}
if ( $http_cookie ~ ^\s*\(\s*\)\s*\{ ) {
        return 403 "Blocked by Shellshock protection (https://blog.x-way.org/Show-Shellshock-the-door).";
}
if ( $http_host ~ ^\s*\(\s*\)\s*\{ ) {
        return 403 "Blocked by Shellshock protection (https://blog.x-way.org/Show-Shellshock-the-door).";
}
if ( $args ~ ^\s*\(\s*\)\s*\{ ) {
        return 403 "Blocked by Shellshock protection (https://blog.x-way.org/Show-Shellshock-the-door).";
}
if ( $content_type ~ ^\s*\(\s*\)\s*\{ ) {
        return 403 "Blocked by Shellshock protection (https://blog.x-way.org/Show-Shellshock-the-door).";
}
if ( $remote_user ~ ^\s*\(\s*\)\s*\{ ) {
        return 403 "Blocked by Shellshock protection (https://blog.x-way.org/Show-Shellshock-the-door).";
}
if ( $request ~ ^\s*\(\s*\)\s*\{ ) {
        return 403 "Blocked by Shellshock protection (https://blog.x-way.org/Show-Shellshock-the-door).";
}
if ( $request_body ~ ^\s*\(\s*\)\s*\{ ) {
        return 403 "Blocked by Shellshock protection (https://blog.x-way.org/Show-Shellshock-the-door).";
}
Sunday, 5. October 2014 Week 40
The Cisco SMB SLM2008 Smart Switch does normally not support SNMP and there is also no setting in the configuration interface which would enable SNMP.
But nevertheless the firmware does actually contain a SNMP daemon. Thus it is not surprising that a smart guy on to the Cisco support forum found out how to manipulate the proprietary config file such that it enables the SNMP daemon:
- Configure your switch with everything you need
- Download enable_snmp.pl
- Run
# perl enable_snmp.pl <IP of your switch>
- Enjoy the SNMP export from the SLM2008 :-)
As this is a non-official hack, there are some limitations:
- The embedded SNMP daemon only supports read accces and no SNMP Traps.
- Changing a setting on the 'System' configuration tab disables the SNMP daemon again (thus the script will need to be run again).
Tuesday, 23. September 2014 Week 39
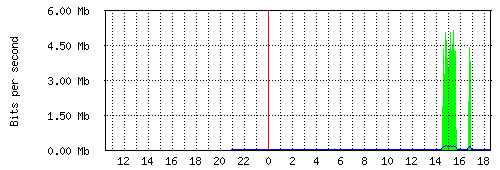
Since last week Netflix is also available in Switzerland. The future has arrived one could say.
Not only gives this easy access to TV shows and movies but also is this access provided via IPv6.
As you can see on the graph below, this brings IPv6 out of slumber and into primetime :-)
Swiss providers are probably seeing quite an increase in IPv6 traffic this month.
Thursday, 4. September 2014 Week 36
SPA901 and SPA3102 phones can be rebooted by calling the following URL (which triggers an automatic config resync after the reboot):
http://<PHONEIP>/admin/reboot
Saturday, 30. August 2014 Week 35
The current configuration of an SPA901 phone can be downloaded like this:
http://<PHONEIP>/admin/spacfg.xml
For SPA3102 devices the URL is different:
http://<PHONEIP>/admin/config.xml
Friday, 25. July 2014 Week 30
Yesterday I switched our DSL Link to green.ch. Now we not only have a higher bandwidth (thanks to VDSL) but also native IPv6 connectivity!
Especially nice is that it all works out of the box. After plugging in the pre-configured FritzBox, it automatically gets an IPv6 prefix via Prefix Delegation and announces it to the clients in the LAN.
08:05 [ aj @ actuarius : ~ ] % mtr -rc5 www.open.ch
Start: Fri Jul 25 08:06:42 2014
HOST: actuarius.fritz.box         Loss%   Snt   Last   Avg  Best  Wrst StDev
  1.|-- fritz.box                  0.0%     5    0.8   0.8   0.7   0.8   0.0
  2.|-- 2a01:2a8::121              0.0%     5    8.6   8.7   8.5   9.2   0.0
  3.|-- 2a01:2a8:0:5a::1           0.0%     5    8.4   8.2   8.0   8.4   0.0
  4.|-- 2a01:2a8:1:7::4            0.0%     5    8.1   8.6   8.1   9.6   0.0
  5.|-- 2a00:db0:9:a06::5          0.0%     5    8.8   8.6   8.3   8.8   0.0
  6.|-- www.open.ch                0.0%     5    8.9   8.7   8.6   8.9   0.0
Wednesday, 28. May 2014 Week 22

Wandtelefon Modell 50 from January 1970 now talks SIP (and it only took two converters, a bit of cable-fiddling and some luck :-)
Thursday, 22. May 2014 Week 21

Friday, 18. April 2014 Week 16
There is currently a bug in Mac OS X 10.9 which causes that ssh-add is no longer able to read SSH key files in PKCS#8 format.
Fortunately ssh-add still reads PKCS#8 keys when provided through STDIN and openssl is able to decrypt PKCS#8 keys.
Thus the following workaround so that PKCS#8 SSH keys can be loaded again:
openssl pkcs8 -in ~/.ssh/id_rsa | ssh-add -
Sunday, 23. March 2014 Week 12
Great presentation by Paul Saab about the IPv6 introduction at Facebook: The Road To IPv6
(via)
Sunday, 19. January 2014 Week 3
When renewing certificates it is a good idea to verify that the newly installed SSL certificate matches the newly installed private key (eg. to make sure no mixup between the new and old files occurred).
This can be done by comparing the modulus of the two files:
openssl x509 -in <certificatefile> -noout -modulus|sha1sum
openssl rsa -in <privatekeyfile> -noout -modulus|sha1sum
Sunday, 12. January 2014 Week 2
Loading the configuration from http://config.server/configfile.xml (provisioning has to be enabled on the phone):
http://<PHONEIP>/admin/resync?http://config.server/configfile.xml
Upgrading the firmware with the image from http://upgrade.server/firmware.bin:
http://<PHONEIP>/upgrade?http://upgrade.server/firmware.bin
Wednesday, 1. January 2014 Week 1
Create the PKA DNS record:
# localpart=andreas domain=jaggi.info url=http://andreas-jaggi.ch/1C6AC951.asc
# LANG=C gpg --fingerprint ${localpart}@${domain}|awk -v local=$localpart -v domain=$domain -v url=$url \
'/fingerprint/{printf("%s._pka.%s. TXT \"v=pka1;fpr=%s;uri=%s\"\n",local,domain,$4$5$6$7$8$9$10$11$12$13,url)}'
andreas._pka.jaggi.info. TXT "v=pka1;fpr=1073501542F38352FC85788207A32EAB1C6AC951;uri=http://andreas-jaggi.ch/1C6AC951.asc"
Test DNS resolution:
# dig +short -t txt andreas._pka.jaggi.info.
"v=pka1\;fpr=1388580990F38352FC85788207A32EAB1C6AC951\;uri=http://andreas-jaggi.ch/1C6AC951.asc"
Test with GPG:
# gpg --auto-key-locate pka -ea -r ${localpart}@${domain}
Detailed explanation of the different DNS publication mechanisms for PGP Keys:
Publishing PGP Keys in DNS
(via)
Sunday, 29. December 2013 Week 52
Instead of the easily brute-forceable one-pass MD5/AES128 password protection format used by SSH per default, you should use the PKCS#8 format to store your private key files. PKCS#8 allows to choose proper key-derivation functions and encryption schemes (for example PBKDF2 and PBES2).
The following commands convert an existing password protected SSH private key file to PKCS#8 format (using PBKDF2, PBES2 and AES-256):
mv ~/.ssh/id_rsa{,.old}
openssl pkcs8 -topk8 -v2 aes256 -in ~/.ssh/id_rsa.old -out ~/.ssh/id_rsa
chmod 600 ~/.ssh/id_rsa
rm ~/.ssh/id_rsa.old
(via Martin Kleppmann)
Friday, 5. July 2013 Week 27

(via blog.quux.de)
Saturday, 1. June 2013 Week 22
After receiving yet another 'please login and click through our captcha for no reason' e-mail from a DynDNS provider, I decided to run my own DynDNS server.
As I already run my own DNS servers, this was just a matter of adding a dynamically updateable zone and writing a script which receives the IP change request via HTTP and sends out a DNS update.
Luckily the DynDNS API is quite well documented and I quickly came up with the PHP code below which performs the task well enough for me. Feel free to use it to run your own DynDNS server.
PS: to any friends reading this and looking for a DynDNS service: drop me a message and I'll set you up with an account.
Tuesday, 28. May 2013 Week 22
Get the glue records for a given domain:
Sunday, 26. May 2013 Week 21
Update the serial number in BIND zone files with the current unix timestamp.
Monday, 25. February 2013 Week 9
I did another test of the Orange Routing.
Running a traceroute to my server in Zurich and one to my vhost in Frankfurt.
First another version of the already familier traceroute to my server in Zurich:
HOST: Andreass-MacBook-Pro.local  Loss%   Snt   Last   Avg  Best  Wrst StDev
  1.|-- 172.20.10.1                0.0%     5    8.0   3.7   2.1   8.0   2.5
  2.|-- 10.8.8.67                  0.0%     5  174.8 114.9  56.7 205.6  69.8
  3.|-- 10.8.12.10                 0.0%     5  126.8 108.4  67.7 171.3  42.8
  4.|-- 192.168.249.201            0.0%     5   73.4  82.7  61.9 111.5  20.5
  5.|-- 192.168.253.191            0.0%     5   54.0  64.9  54.0  75.9   9.3
  6.|-- 192.168.250.203            0.0%     5   64.7  69.2  57.3  79.2   8.4
  7.|-- 10.10.10.10                0.0%     5   56.8  65.5  56.8  72.1   7.7
  8.|-- 10.255.200.1               0.0%     5   65.9  87.3  60.1 146.6  35.1
  9.|-- pos0-1-1-1.gencr1.geneve.  0.0%     5   84.8 117.1  76.4 162.5  36.9
 10.|-- pos14-0-1.pascr4.paris.op  0.0%     5   88.1 118.0  88.1 168.3  36.7
 11.|-- ge6-0-0.br2.par2.alter.ne  0.0%     5   76.5  90.5  76.5 109.1  12.0
 12.|-- so-2-3-0.xt2.zur3.alter.n  0.0%     5   76.8 109.1  76.8 203.2  53.1
 13.|-- pos2-0.gw4.zur4.alter.net  0.0%     5   88.8  98.7  84.3 143.4  25.2
 14.|-- uch200193-gw.customer.alt  0.0%     5   90.7  85.3  74.1  93.5   8.0
 15.|-- whale29.open.ch            0.0%     5   88.9  97.7  88.9 104.7   6.3
 16.|-- orca8.open.ch              0.0%     5   90.8  94.8  90.8 102.8   4.9
 17.|-- real.jaggi.info           20.0%     5  234.8 130.0  92.8 234.8  69.9
Now the traceroute to the vhost in Frankfurt:
HOST: Andreass-MacBook-Pro.local  Loss%   Snt   Last   Avg  Best  Wrst StDev
  1.|-- 172.20.10.1                0.0%     5   15.2  13.1   1.9  44.5  18.4
  2.|-- 10.8.8.115                 0.0%     5   72.6  74.0  67.2  81.3   6.8
  3.|-- 10.8.12.10                 0.0%     5   80.7  75.0  64.0  89.6  10.3
  4.|-- 192.168.249.201            0.0%     5   65.1  78.9  65.1  94.0  12.3
  5.|-- 192.168.253.191            0.0%     5   73.1  70.4  66.5  73.3   2.8
  6.|-- 192.168.250.203            0.0%     5   69.5  73.9  66.3  86.6   7.7
  7.|-- 10.10.10.10                0.0%     5   67.0  72.7  67.0  80.0   4.9
  8.|-- 10.255.200.1               0.0%     5   70.9  74.4  69.7  86.4   7.0
  9.|-- pos0-1-1-1.gencr1.geneve.  0.0%     5   77.2  83.4  75.9  99.4   9.4
 10.|-- pos3-1-0.zurcr1.zurich.op  0.0%     5   83.8 103.2  83.8 146.9  26.3
 11.|-- pos0-9-4-0.ffttr1.frankfu  0.0%     5  102.9 103.6  98.7 108.8   4.9
 12.|-- leaseweb-9.gw.opentransit  0.0%     5   87.6  88.8  85.3  93.2   3.0
 13.|-- te3-1.core-2.fra.leaseweb  0.0%     5   85.4  91.5  85.4 106.1   8.5
 14.|-- hosted-by.leaseweb.com     0.0%     5   90.2  94.1  84.7 112.5  11.0
 15.|-- ???                       100.0     5    0.0   0.0   0.0   0.0   0.0
 16.|-- 0.jaggi.info              20.0%     5   89.9 117.5  86.3 205.5  58.7
As you can see, the RTT is higher for the server in Zurich than for the vhost in Frankfurt! (keep in mind that source of these measurement is my laptop in the train 8 minutes away from Zurich now)
So Orange has higher latency to hosts in the same region/city than to hosts in another country which are more than 350km away. :-(
The next time I choose a mobile provider it might be good to analyse its BGP peerings and routing policies first...
While in the train from Bern to Zurich, I did a traceroute towards the server which currently hosts this weblog (it is located at Open Systems in Zurich). The connection starts on my laptop and is thethered via my cell to the Orange backbone.
HOST: Andreass-MacBook-Pro.local  Loss%   Snt   Last   Avg  Best  Wrst StDev
  1.|-- 172.20.10.1                0.0%     5    2.0  12.1   1.7  33.2  14.6
  2.|-- 10.8.8.67                  0.0%     5   52.2 373.4  52.2 1241. 504.8
  3.|-- 10.8.12.10                 0.0%     5   50.9 347.4  50.9 1143. 453.3
  4.|-- 192.168.249.201            0.0%     5   51.2 282.7  51.2 1042. 426.8
  5.|-- 192.168.253.191            0.0%     5   51.2 226.2  44.5 942.2 400.3
  6.|-- 192.168.250.203            0.0%     5   51.4 206.7  37.9 847.5 358.2
  7.|-- 10.10.10.10                0.0%     5   50.0 181.4  29.6 746.9 316.2
  8.|-- 10.255.200.1               0.0%     5   50.0 172.2  36.9 645.6 264.9
  9.|-- 193.251.248.145            0.0%     4   60.2  59.8  46.2  81.9  15.8
 10.|-- 193.251.240.53             0.0%     4   70.0  76.4  64.9 101.6  16.9
 11.|-- 146.188.112.77             0.0%     4   70.4  74.0  69.2  83.8   6.7
 12.|-- 146.188.5.1                0.0%     4   70.6  71.7  58.1  88.1  12.3
 13.|-- 146.188.4.194              0.0%     4   70.5  61.9  51.6  70.9  10.2
 14.|-- 146.188.64.74              0.0%     4   71.3  69.2  58.8  75.4   7.2
 15.|-- 213.156.230.29             0.0%     4   71.5  78.3  62.6 108.9  20.7
 16.|-- 213.156.229.8              0.0%     4   72.2  75.2  70.4  81.9   5.1
 17.|-- 213.156.229.222           25.0%     4   80.8  76.2  61.2  86.5  13.3
You can see that the traffic is passed through 8 different routers inside the Orange backbone (using IPs from all three RFC1918 ranges...) before it is let onto the Internet.
And then the real fun starts (let's use DNS names for this):
HOST: Andreass-MacBook-Pro.local  Loss%   Snt   Last   Avg  Best  Wrst StDev
  1.|-- 172.20.10.1                0.0%     5    2.0  12.2   1.9  33.3  14.5
  2.|-- 10.8.8.67                  0.0%     5   44.2 345.6  27.0 1167. 494.2
  3.|-- 10.8.12.10                 0.0%     5   52.2 308.9  27.0 1104. 462.4
  4.|-- 192.168.249.201            0.0%     5   33.4 264.9  27.2 1014. 427.1
  5.|-- 192.168.253.191            0.0%     5   30.3 227.5  27.3 952.9 406.4
  6.|-- 192.168.250.203            0.0%     5   50.4 200.7  27.0 860.0 368.7
  7.|-- 10.10.10.10                0.0%     5   72.4 193.5  30.5 779.2 327.8
  8.|-- 10.255.200.1               0.0%     5   31.8 166.8  27.6 688.0 291.5
  9.|-- pos0-1-1-1.gencr1.geneve.  0.0%     4   50.8  55.0  47.6  67.1   8.6
 10.|-- pos14-0-1.pascr4.paris.op  0.0%     4   61.0  64.4  57.7  78.5   9.5
 11.|-- ge6-0-0.br2.par2.alter.ne  0.0%     4   70.8  56.3  48.4  70.8   9.9
 12.|-- so-2-3-0.xt2.zur3.alter.n  0.0%     4  108.9  65.6  48.0 108.9  29.2
 13.|-- pos2-0.gw4.zur4.alter.net  0.0%     4   51.7  55.5  50.3  68.8   8.8
 14.|-- uch200193-gw.customer.alt  0.0%     4  171.8  83.6  50.7 171.8  58.8
 15.|-- whale29.open.ch            0.0%     4  132.1  90.0  59.2 132.1  32.7
 16.|-- orca8.open.ch              0.0%     4   72.4  66.8  58.6  73.5   7.3
 17.|-- real.jaggi.info           25.0%     4   80.2  64.7  56.2  80.2  13.4
As we see, Orange injects their mobile data traffic into the Internet in Geneva (pos0-1-1-1.gencr1.geneve.).
Then it is first sent to Paris (pas14-0-1.pascr4.paris.op and ge6-0-0.br2.par2.alter.ne) and from there back to Zurich (so-2-3-0.xt2.yur3.alter.n and all the following hosts).
I can kind of understand that the traffic is routed via Geneva (main Orange infrastructure is there), but why is it sent to Paris? (especially since Geneva<->Zurich is the main Internet connection inside Switzerland where most of the countries fiber is buried).
I guess this explains why my mobile data speed is not always as fast as I like it to be...
Monday, 18. February 2013 Week 8
When using more than one dynamic routing protocol, make sure to know their administrative distance.
Further it is usually a bad idea to redistribute routes from a dynamic routing protocol into another one with a lower administrative distance. Especially when having multiple handover points between the two protocols.
Wednesday, 13. February 2013 Week 7
When setting up a new BGP peering, you may want to test if your peering partner uses the correct MD5 password without bringing up your side of the session.
For this the tcpdump option -M can be used to supply the MD5 password when sniffing the traffic of the new peer:
tcpdump -ni eth0 -M MyBgPMd5PaSsWoRd tcp port 179
tcpdump will then verify the MD5 signature for every packet where it finds a MD5 signature TCP option as specified in RFC2385.
In the output you will see md5valid for packets where your password matches the MD5 signature or md5invalid for packets where your password does not match the MD5 signature.
If you see neither md5valid nor md5invalid then the peer did not configure any MD5 BGP password.
If you want to check for mismatching MD5 passwords after you bring up the BGP session, just look into the kernel log. Linux reports invalid MD5 TCP signatures like this:
MD5 Hash failed for (1.2.3.4, 56789)->(1.2.3.5, 179)
Sunday, 30. December 2012 Week 52
To avoid the timeconsuming manual configuration of a proxy server on all computers, phones and tablets, the proxy configuration can be provided automatically via DHCP by using WPAD.
For this setup, the following components are needed:
- A DHCP server which announces DHCP option 252 with the URL of the PAC file (wpad.dat).
- A webserver which serves the wpad.dat file
- A wpad.dat PAC file where the Proxy IP is defined
On a MikroTik system, the DHCP server configuration looks like this:
/ip dhcp-server option
add code=252 name=local-pac-server value="http://192.168.0.2:80/wpad.dat\?"
/ip dhcp-server network
add address=192.168.0.0/24 dhcp-option=local-pac-server dns-server=192.168.0.1 gateway=192.168.0.1 netmask=24
Please note the trailing questionmark in the URL for the PAC file. This is a workaround for yet another occurrence of RFC nitpicking where some implementations might misinterpret the DHCP option and add an encoded NULL-byte character to the end of the URL when requesting the PAC file from the webserver.
With the questinmark at the end of the URL, any additional trailing NULL-byte character will be ignored by the webserver and the PAC file will be loaded just fine.
Following the example above, on the machine 192.168.0.2, we serve the following wpad.dat file:
function FindProxyForURL ( url, host ) {
	return "PROXY 1.2.3.4:8080; DIRECT";
}
With this setup, all systems will use the proxy at 1.2.3.4 and if the proxy is not available try to connect directly to the Internet.
While this is fine for a home network where the proxy is mostly used for adblocking, you probably want to remove the DIRECT part in an enterprise setup.
Tuesday, 28. August 2012 Week 35

Sunday, 5. August 2012 Week 31
The Cisco WAP121 runs a Linux based firmware. This is how you get a Rootshell on it:
- Login to the Web GUI of the WAP121 and enable the SSH management access
- Login with SSH and enter this command:
sh
This probably works with the Cisco WAP321 as well (I only tested with the WAP121).
Also when having still only the one 'cisco' user account configured you can directly get a Rootshell via SSH like this: ssh -l root@<WAP121 IP>
Monday, 21. April 2008 Week 17
Mibbit.com provides an IRC webinterface, so you can hang around in your favorite channels with your iPhone/PDA/fridge/whatever.
Wednesday, 9. January 2008 Week 2
- Compute your 6to4 IPv6 address (2002:uuuu:vvvv::1) from your IPv4 address (a.b.c.d):
printf "2002:%02x%02x:%02x%02x::1\n" a b c d
- Add a SIT (IPv6-in-IPv4) interface in /etc/network/interfaces:
auto sit0

iface sit0 inet6 static

        address 2002:uuuu:vvvv::1

        netmask 64

        gateway ::192.88.99.1
ifup sit0
Now you can also add AAAA DNS records with 2002:uuuu:vvvv::1 for your domain(s).
Monday, 16. June 2003 Week 25
Da hab ich nun mit nem 486 nen superleisen 'Server' gebastelt und kaum den Apache installiert und alles eingerichtet, schon sieht's im accesslog so aus:
192.168.23.6 - - [15/Jun/2003:17:58:38 +0200] "GET / HTTP/1.1" 200 71 "-" "Mozilla/5.0 (X11; U; Linux i686; en-US; rv:1.4b) Gecko/20030605 Mozilla Firebird/0.6"
(Mein erster Zugriff, davon hats natürlich noch n paar mehr *g*)
212.156.34.148 - - [15/Jun/2003:21:39:49 +0200] "GET /default.ida?XXXXXXXXXXXXXXXXXXXXXXXXXXXXXXXXXXXXXXXXXXXXXXXXXXXXXXXXXXXXXXXXXXXXXXXXXXXXXXXXXXXXXXXXXXXXXXXXXXXXXXXXXXXXXXXXXXXXXXXXXXXXXXXXXXXXXXXXXXXXXXXXXXXXXXXXXXXXXXXXXXXXXXXXXXXXXXXXXXXXXXXXXXXXXXXXXXXXXXXXXXXXXXXXXXXXXXXXXXXXXXXX%u9090%u6858%ucbd3%u7801%u9090%u6858%ucbd3%u7801%u9090%u6858%ucbd3%u7801%u9090%u9090%u8190%u00c3%u0003%u8b00%u531b%u53ff%u0078%u0000%u00=a HTTP/1.0" 404 266 "-" "-"
212.174.107.18 - - [15/Jun/2003:23:24:03 +0200] "GET /default.ida?XXXXXXXXXXXXXXXXXXXXXXXXXXXXXXXXXXXXXXXXXXXXXXXXXXXXXXXXXXXXXXXXXXXXXXXXXXXXXXXXXXXXXXXXXXXXXXXXXXXXXXXXXXXXXXXXXXXXXXXXXXXXXXXXXXXXXXXXXXXXXXXXXXXXXXXXXXXXXXXXXXXXXXXXXXXXXXXXXXXXXXXXXXXXXXXXXXXXXXXXXXXXXXXXXXXXXXXXXXXXXXXX%u9090%u6858%ucbd3%u7801%u9090%u6858%ucbd3%u7801%u9090%u6858%ucbd3%u7801%u9090%u9090%u8190%u00c3%u0003%u8b00%u531b%u53ff%u0078%u0000%u00=a HTTP/1.0" 404 266 "-" "-"
212.181.34.130 - - [15/Jun/2003:23:45:21 +0200] "GET /scripts/root.exe?/c+dir HTTP/1.0" 404 271 "-" "-"
212.181.34.130 - - [15/Jun/2003:23:45:21 +0200] "GET /MSADC/root.exe?/c+dir HTTP/1.0" 404 269 "-" "-"
212.181.34.130 - - [15/Jun/2003:23:45:21 +0200] "GET /c/winnt/system32/cmd.exe?/c+dir HTTP/1.0" 404 279 "-" "-"
212.181.34.130 - - [15/Jun/2003:23:45:21 +0200] "GET /d/winnt/system32/cmd.exe?/c+dir HTTP/1.0" 404 279 "-" "-"
212.181.34.130 - - [15/Jun/2003:23:45:22 +0200] "GET /scripts/..%255c../winnt/system32/cmd.exe?/c+dir HTTP/1.0" 404 293 "-" "-"
212.181.34.130 - - [15/Jun/2003:23:45:22 +0200] "GET /_vti_bin/..%255c../..%255c../..%255c../winnt/system32/cmd.exe?/c+dir HTTP/1.0" 404 310 "-" "-"
212.181.34.130 - - [15/Jun/2003:23:45:22 +0200] "GET /_mem_bin/..%255c../..%255c../..%255c../winnt/system32/cmd.exe?/c+dir HTTP/1.0" 404 310 "-" "-"
212.181.34.130 - - [15/Jun/2003:23:45:25 +0200] "GET /msadc/..%255c../..%255c../..%255c/..%c1%1c../..%c1%1c../..%c1%1c../winnt/system32/cmd.exe?/c+dir HTTP/1.0" 404 326 "-" "-"
212.181.34.130 - - [15/Jun/2003:23:45:29 +0200] "GET /scripts/..%c1%1c../winnt/system32/cmd.exe?/c+dir HTTP/1.0" 404 292 "-" "-"
212.181.34.130 - - [15/Jun/2003:23:45:29 +0200] "GET /scripts/..%c0%2f../winnt/system32/cmd.exe?/c+dir HTTP/1.0" 404 292 "-" "-"
212.181.34.130 - - [15/Jun/2003:23:45:29 +0200] "GET /scripts/..%c0%af../winnt/system32/cmd.exe?/c+dir HTTP/1.0" 404 292 "-" "-"
212.181.34.130 - - [15/Jun/2003:23:45:29 +0200] "GET /scripts/..%c1%9c../winnt/system32/cmd.exe?/c+dir HTTP/1.0" 404 292 "-" "-"
212.181.34.130 - - [15/Jun/2003:23:45:30 +0200] "GET /scripts/..%%35%63../winnt/system32/cmd.exe?/c+dir HTTP/1.0" 400 276 "-" "-"
212.181.34.130 - - [15/Jun/2003:23:45:30 +0200] "GET /scripts/..%%35c../winnt/system32/cmd.exe?/c+dir HTTP/1.0" 400 276 "-" "-"
212.181.34.130 - - [15/Jun/2003:23:45:30 +0200] "GET /scripts/..%25%35%63../winnt/system32/cmd.exe?/c+dir HTTP/1.0" 404 293 "-" "-"
212.181.34.130 - - [15/Jun/2003:23:45:30 +0200] "GET /scripts/..%252f../winnt/system32/cmd.exe?/c+dir HTTP/1.0" 404 293 "-" "-"
Friday, 21. February 2003 Week 8
E-Mail Abrufen etc. geht natürlich auch nicht, da die Domain mail.waterwave.ch laut Mozilla gar nicht existiert. und ein 'ping waterwave.ch' ergibt nur 'ping: unknown host waterwave.ch' :-(
Warum, Warum, WWAAARRUUUMM ???
Ich kann waterwave.ch und jegliche Domains die darauf umgeleitet werden von zu Hause aus nicht mehr erreichen! Auch andere Domains (sunflyer.ch, ubique.ch) kann ich nicht erreichen, resp. kann mein PC nicht finden!
Wenn ich jedoch mit einem 'Anonymisierer' (nonymouse.com) darauf zugreife, funktioniert alles problemlos (z.B. dieses Posting).
Kann mir bitte jemand (möglichst viele *g*) mitteilen, ob die genannten Domains auch bei anderen Leuten nicht erreichbar sind. Ich vermute nämlich, dass Solnet irgend einem richterlichen Befehl folgt und das Internet nur zensiert ausliefert! Frage mich nur, was die obgenannten Domains so böses angestellt haben, damit sie versteckt werden müssen...
Monday, 27. January 2003 Week 5
würde es an einer LAN heissen.
Das Internet lahmt momentan teilweise wie Sau und es liegt vermutlich daran, da ich nicht wie andere mit T-Dings ins Netz gehe *hehe*
Monday, 25. November 2002 Week 48
Noch eine Gedächtnisstütze: TCP/IP - Lehrgang von Dr. Rudolf Strub
Thursday, 21. November 2002 Week 47
Sur RFC-Editeur.org il y a des traductions françaises des RFC. Les RFC sont des documents qui font référence auprès de la Communauté Internet et qui décrivent, spécifient, aident à l'implémentation, standardisent et débattent de la majorité des normes, standards, technologies et protocoles liés à Internet et aux réseaux en général.
Monday, 2. September 2002 Week 36

Für alle, die sich nicht der Strahlung eines Wireless Netzwerks aussetzen wollen aber trotzdem draussen im Park arbeiten wollen, gibt es jetzt eine Alternative: 90m Cat.5 Kabelrolle mit integriertem 8-Port Switch
Erhältlich bei arp.ch (Prod.Nr. 230791)
Jedoch ist der Preis mit CHF 899.- IMHO ein bisschen sehr hoch. Da ist ein Wireless-Netz nicht viel teurer, wenn nicht sogar billiger!
Saturday, 10. August 2002 Week 32
Als ich die Kategorie Linux einfügte, sah ich, dass bei ihrem Aufruf "...index.php?cat=5" erscheint. Als mehr oder weniger geübter LAN-Bastler assoziere ich "cat 5" aber mit Netzwerk und nicht mit Linux. So musste dann noch schnell die Kategorie Networking entstehen und Linux wurde eine Stufe weitergeschoben. Dies interessiert vermutlich niemanden; aber es erklärt warum bis jetzt eine leere Seite erschien wenn man "...?cat=5" eingab. Nun ist dies das erste Posting in dieser Kategorie und es werden noch weitere folgen (vermutlich nicht allzu häufig ;-)