Christmas Run
Run #9 around Centennial Park. Two rounds again, this time during noon with some nice sun and a whopping 30°C :-)
Run #9 around Centennial Park. Two rounds again, this time during noon with some nice sun and a whopping 30°C :-)
Run #8 around Centennial Park. Two rounds again, and with some rain :-(
Run #7 around Centennial Park. Only one round, but the fastest one so far.
Run #6 around Centennial Park. Two rounds this time, with a slower pace though.
Run #5 around Centennial Park. Didn't have the patience to wait for the GPS to lock onto the signal, thus the late start.
Run #4 around Centennial Park, this time a bit later and thus with more sun:
Another run around Centennial Park, this time counterclockwise:
Next run around the beautiful Centennial Park:
The nice thing of being in Sydney during December is that you can go running during christmas time and it is 22°C :-)
The UNIX System: Making Computers More Productive, 1982, Bell Laboratories
SixSpotting, a funny little game where you collect points by logging in from as many IPv6 enabled providers as possible.
Lately the requests trying to exploit the Shellshock vulnerability are getting annoying.
Of course my hosts are patched — even before the first such request arrived — and they are using Dash as /bin/sh anyway.
But this does not stop attackers from sending those requests.
Some even seem to have programmed a loop which sends request after request even though their exploit is not working.
Since most of the requests are for valid URLs, the webserver just replies with a 200 status code and serves the content. As this gives no indication to the attacker whether his exploit worked or not, he has no reason to remove the host from his target-list and thus continues to send requests.
To break this pattern and signal that the host is not vulnerable to Shellshock, I came up with the nginx config snippet below. It recognizes Shellshock patterns in a request and replies with a '403 Forbidden' status code, thus indicating to an attacker that his request was blocked.
if ( $http_referer ~ ^\s*\(\s*\)\s*\{ ) {
        return 403 "Blocked by Shellshock protection (https://blog.x-way.org/Show-Shellshock-the-door).";
}
if ( $http_user_agent ~ ^\s*\(\s*\)\s*\{ ) {
        return 403 "Blocked by Shellshock protection (https://blog.x-way.org/Show-Shellshock-the-door).";
}
if ( $http_cookie ~ ^\s*\(\s*\)\s*\{ ) {
        return 403 "Blocked by Shellshock protection (https://blog.x-way.org/Show-Shellshock-the-door).";
}
if ( $http_host ~ ^\s*\(\s*\)\s*\{ ) {
        return 403 "Blocked by Shellshock protection (https://blog.x-way.org/Show-Shellshock-the-door).";
}
if ( $args ~ ^\s*\(\s*\)\s*\{ ) {
        return 403 "Blocked by Shellshock protection (https://blog.x-way.org/Show-Shellshock-the-door).";
}
if ( $content_type ~ ^\s*\(\s*\)\s*\{ ) {
        return 403 "Blocked by Shellshock protection (https://blog.x-way.org/Show-Shellshock-the-door).";
}
if ( $remote_user ~ ^\s*\(\s*\)\s*\{ ) {
        return 403 "Blocked by Shellshock protection (https://blog.x-way.org/Show-Shellshock-the-door).";
}
if ( $request ~ ^\s*\(\s*\)\s*\{ ) {
        return 403 "Blocked by Shellshock protection (https://blog.x-way.org/Show-Shellshock-the-door).";
}
if ( $request_body ~ ^\s*\(\s*\)\s*\{ ) {
        return 403 "Blocked by Shellshock protection (https://blog.x-way.org/Show-Shellshock-the-door).";
}
Before sending a CSR off to your CA, it is worth checking that all parameters are correct.
Especially you should make sure that the requested signature algorithm is SHA256 and not the deprecated SHA1.
This can be done with the following OpenSSL command:
openssl req -noout -text -in <your_CSR_file>
Spot-on representation of every IKEA store's layout:

SEASONS of NORWAY - A Time-Lapse Adventure from Rustad Media on Vimeo. (via)
The Cisco SMB SLM2008 Smart Switch does normally not support SNMP and there is also no setting in the configuration interface which would enable SNMP.
But nevertheless the firmware does actually contain a SNMP daemon. Thus it is not surprising that a smart guy on to the Cisco support forum found out how to manipulate the proprietary config file such that it enables the SNMP daemon:
# perl enable_snmp.pl <IP of your switch>As this is a non-official hack, there are some limitations:
The Cyborgs is a two man 'elektrock' boogie band.
Thank you Sat Rocks for showing me their music :-)
Today I did some cleanup of my legacy infrastructure. The repositories formerly located at cvs.x-way.org and svn.x-way.org have been converted to Git and are now available at git.x-way.org.
Also is git.x-way.org now no longer served by the old gitweb.cgi but by the fantastic GitBucket (a lightweight, self-contained GitHub clone written in Scala).
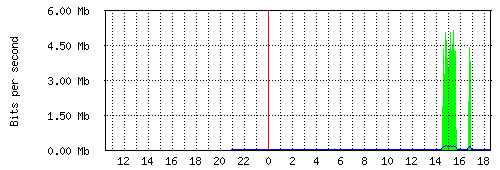
Since last week Netflix is also available in Switzerland. The future has arrived one could say.
Not only gives this easy access to TV shows and movies but also is this access provided via IPv6.
As you can see on the graph below, this brings IPv6 out of slumber and into primetime :-)
Swiss providers are probably seeing quite an increase in IPv6 traffic this month.
The about page now features some fancy blog statistics, check it out :-)
The statistics are created with the help of Cal-Heatmap which allows to easily create calendar heatmaps similar to the activity heatmap of GitHub.
Update: couldn't stop playing around and thus added another chart, this time with the help of C3.js (a D3.js based reusable chart library).
SPA901 and SPA3102 phones can be rebooted by calling the following URL (which triggers an automatic config resync after the reboot):
http://<PHONEIP>/admin/reboot
The current configuration of an SPA901 phone can be downloaded like this:
http://<PHONEIP>/admin/spacfg.xml
For SPA3102 devices the URL is different:
http://<PHONEIP>/admin/config.xml
Yesterday I switched our DSL Link to green.ch. Now we not only have a higher bandwidth (thanks to VDSL) but also native IPv6 connectivity!
Especially nice is that it all works out of the box. After plugging in the pre-configured FritzBox, it automatically gets an IPv6 prefix via Prefix Delegation and announces it to the clients in the LAN.
08:05 [ aj @ actuarius : ~ ] % mtr -rc5 www.open.ch
Start: Fri Jul 25 08:06:42 2014
HOST: actuarius.fritz.box         Loss%   Snt   Last   Avg  Best  Wrst StDev
  1.|-- fritz.box                  0.0%     5    0.8   0.8   0.7   0.8   0.0
  2.|-- 2a01:2a8::121              0.0%     5    8.6   8.7   8.5   9.2   0.0
  3.|-- 2a01:2a8:0:5a::1           0.0%     5    8.4   8.2   8.0   8.4   0.0
  4.|-- 2a01:2a8:1:7::4            0.0%     5    8.1   8.6   8.1   9.6   0.0
  5.|-- 2a00:db0:9:a06::5          0.0%     5    8.8   8.6   8.3   8.8   0.0
  6.|-- www.open.ch                0.0%     5    8.9   8.7   8.6   8.9   0.0
12 years ago I started this weblog with a link to www.2advanced.com.
It's now 555 posts later and I think what is most unexpected (besides that this weblog is still existing 12 years later), is that this first link from my first post is still valid (and still pointing to some Flash-only website...).
So far this weblog has survived 2 different domains, 3 different servers, multiple versions of a self-made blogging-engine, about 6 different layout designs, a database-crash, recovery via archive.org and a migration to Jekyll.
No guarantee that it will last another 12 years, but for the meantime: Cheers, and enjoy the ride!


Wandtelefon Modell 50 from January 1970 now talks SIP (and it only took two converters, a bit of cable-fiddling and some luck :-)

There is currently a bug in Mac OS X 10.9 which causes that ssh-add is no longer able to read SSH key files in PKCS#8 format.
Fortunately ssh-add still reads PKCS#8 keys when provided through STDIN and openssl is able to decrypt PKCS#8 keys.
Thus the following workaround so that PKCS#8 SSH keys can be loaded again:
openssl pkcs8 -in ~/.ssh/id_rsa | ssh-add -
Great presentation by Paul Saab about the IPv6 introduction at Facebook: The Road To IPv6
(via)
guest# poweroff
newmachine# lvcreate -L 120G -n myguest myvolgroup
oldmachine# dd if=/dev/vg_foo/lv_bar | ssh newmachine dd of=/dev/volgroup/myguest
newmachine# /etc/init.d/libvirt-bin reload
newmachine# virsh start myguest
e2fsck -f /dev/vg_foo/lv_bar
resize2fs /dev/vg_foo/lv_bar 180G
lvreduce -L 190G /dev/vg_foo/lv_bar
resize2fs /dev/vg_foo/lv_bar
e2fsck -f /dev/vg_foo/lv_bar
When renewing certificates it is a good idea to verify that the newly installed SSL certificate matches the newly installed private key (eg. to make sure no mixup between the new and old files occurred).
This can be done by comparing the modulus of the two files:
openssl x509 -in <certificatefile> -noout -modulus|sha1sum
openssl rsa -in <privatekeyfile> -noout -modulus|sha1sum
Loading the configuration from http://config.server/configfile.xml (provisioning has to be enabled on the phone):
http://<PHONEIP>/admin/resync?http://config.server/configfile.xml
Upgrading the firmware with the image from http://upgrade.server/firmware.bin:
http://<PHONEIP>/upgrade?http://upgrade.server/firmware.bin
Create the PKA DNS record:
# localpart=andreas domain=jaggi.info url=http://andreas-jaggi.ch/1C6AC951.asc
# LANG=C gpg --fingerprint ${localpart}@${domain}|awk -v local=$localpart -v domain=$domain -v url=$url \
'/fingerprint/{printf("%s._pka.%s. TXT \"v=pka1;fpr=%s;uri=%s\"\n",local,domain,$4$5$6$7$8$9$10$11$12$13,url)}'
andreas._pka.jaggi.info. TXT "v=pka1;fpr=1073501542F38352FC85788207A32EAB1C6AC951;uri=http://andreas-jaggi.ch/1C6AC951.asc"
Test DNS resolution:
# dig +short -t txt andreas._pka.jaggi.info.
"v=pka1\;fpr=1388580990F38352FC85788207A32EAB1C6AC951\;uri=http://andreas-jaggi.ch/1C6AC951.asc"
Test with GPG:
# gpg --auto-key-locate pka -ea -r ${localpart}@${domain}
Detailed explanation of the different DNS publication mechanisms for PGP Keys:
Publishing PGP Keys in DNS
(via)